
|
DEW HEATER CONTROLLERS |
Dew forms by water vapour in the atmosphere condensing out onto a surface at a particular temperature. At any given instant the air has a moisture content which can be measured using a Relative Humidity meter. (RH is the ratio of actual vapour pressure to saturated vapour pressure at the same temperature). Knowing the ambient temperature and the pressure you can look up the temperature called the Dew Point. In astronomy we are looking up at clear night skies, so the air temperature is usually falling. If the surface of an object falls below the dew point then the vapour will condense. The air at this point is saturated and the relative humidity is 100%. The dew point temperature can be well below zero degrees C with dry air, in which case the water vapour will condense out straight into an ice film, called a Hoar frost, covering the optics. Different materials cool at different rates when subject to cloudless night air, metal and glass being the worst. Insulators such plastics, cardboard will last longest before dewing. Black surfaces will also radiate better than white ones.
DEW HEATERS
Dew heaters are made from electrically resistive material sewn into an insulating jacket, made into long strips with Velcro at the ends so that the unit can be wrapped around the barrel at the location of the lens or mirror that is to be heated. Normally all optics should work at the ambient temperature of the air to avoid thermals affecting the image. You will know that poor quality images in reflectors can result if a mirror has not cooled down before you start observing. However the optics can go below the 'dew point' at which temperature the optics go misty (water condenses) and the image is lost. To extend observing, the optics can be heated to keep them above the dew point. It is best to fix the dew heater tape an inch or so behind the element to be warmed to allow tube currents also to warm the central part of the lens when it is pointing upwards.
So we have two problems, what is the dew point at that instant and how much power to put into the dew heater.
. . . . PROPER THERMAL MANAGEMENT. . . .
First step is get to know the thermal characteristics of your lens. In a nutshell you would carry out some experiments by supplying a known power, letting the assembly stabilise and noting the surface temperature rise above ambient. Thereafter if you require a two degree rise in temperature you will be able to dial in the power to apply and away you go. The AWR product range of heater controllers gives you a linear scale of power irrespective of battery condition so the conditions will be repeatable. bear in mind that glass does not conduct heat that well, so the temperature in the middle of the surface will be different to the outer edge if it is the outer edge you are heating up.
The 'dew point', as we have shown, depends on relative humidity and pressure and so is complicated to measure and calculate. A guide price for this type of controller is 400.00 GBP. An easier way to do this is to control the temperature of a small mirror and keep it at the dew point when a film of moisture can be detected automatically. Such instruments exist but tend to be expensive. An even easier way to do it is to cool down a mirror and look at it, reading off the temperature at which dewing occurs. The dew point temperature is likely to stay reasonably constant during an observing session, but if the temperature is cooling then more heat will be required to avoid dewing up. A scattered light dew point detector is a good idea for a further product.
Further preventative measures involve fans, dew baffles and insulating surfaces. However bear in mind the image will suffer unless it is close to the ambient temperature of the surrounding air. Whatever you do the power setting is a bit 'trial and error', not too much else the image degrades but enough to provide warming above the dew point.
| PRODUCT DEW I
FEATURES
|
| ||||||||||||||||||||||||
| Ł59.00 inc VAT | |||||||||||||||||||||||||
|---|---|---|---|---|---|---|---|---|---|---|---|---|---|---|---|---|---|---|---|---|---|---|---|---|---|
 |
|||||||||||||||||||||||||
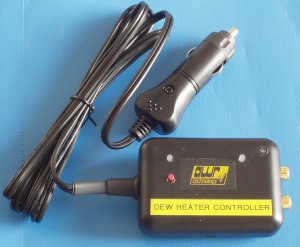
This product allows you to attach any standard Dew Heater up to the maximum wattage range suitable. It assumes the voltage rating is for 12 VOLT and measures the 100% power rating on the fly. It does not have to be dialled in. The push button control nudges the output to the next higher level, 0% to 100% in 10% steps, calibrated in percent of full power, and shows you the setting by the number of flashes. Eleven presses of the switch will take you back to zero. If you carry out power versus temperature rise experiments then you can dial in the exact temperature rise you need. Output of 0% for whatever reason has the OUTPUT LED OFF.
The internal microprocessor keeps an eye on the voltage and current. The Input Voltage lamp will go RED if above 15V or below 11.2V when drawing power, at which point a lead-acid battery is nearly discharged. The voltage measurement is accurately calibrated to give uniform indications. At the low input, DEWI avoids giving the battery any further discharge (and stopping any damage) by turning OFF the heater current and the OUTPUT LED OFF. In normal use the Ouput Monitor lamp is GREEN but will indicate RED if the output is uncontrolled or open circuit, or above the 60 Watt rating (possibly short circuit). A reversed battery connection will apply full power to the heater but both lamps will be FLASHING RED indicating REVERSE INPUT FAULT and OUTPUT UNCONTROLLED. This allows you to investigate properly, before a fuse blows or your image is spoiled by a loose or broken wire connection
The power circuit uses highly efficient PWM technology by microprocessor and so generates very little heat itself, resulting in a small but powerful unit. There are no batteries and as a bonus the circuits are fully protected from reverse polarity and do not emit RF interference to CCD cameras and other equipment. Because of the input voltage state monitoring it will take care of your battery or Power Tank and will not let it go completely flat.
This product is also available through ASTRONOMIA and The WIDESCREEN CENTRE where you can also buy Dew Heater strips in various sizes by various suppliers.
| CODE | PRODUCT LINEUP | PRICE |
|---|---|---|
| DEW I | Dew Heater Controller, MAX 60 WATTS controlled | Ł59.00 |
| PHONO/ADAP | PHONO output splitter. Gold plated contacts. Connect two heater strips to one output |
Ł5.00 |
| PSU3/DEW | Mains adapter 12V DC output at 5 Amps with correct socket fitted | Ł55.00 |
| DEW/XTN | 2 metre Cigar connector extension lead (battery side), fused 5 Amps | Ł8.00 |
HEATER TAPES
Velcro backed tapes of 5 watts heating capacity in a variety of sizes for your telescope and eyepiece.
| CODE | SIZE | PRICE |
|---|---|---|
| HEAT/2 | Eyepiece sized 1-1/4 inch and 2 inch | POA |
| HEAT/6 | Tube diameter 3 inch to 6 inch | POA |
| HEAT/9 | Tube diameter 7 inch to 9 inch | POA |
| AWR HOME PAGE | PRICING |
© 2009-15 AWR Technology